Source: https://www.maketecheasier.com/record-wi…8Make+Tech+Easier%29
Capture Date: 26.04.2018 22:26:08
VLC Media player is hailed as the Swiss Army Knife of all media players, and its supremacy is not without reason. Just throw any media file at it, and this smart player will not only play but also give you endless options while allowing you to view all relevant file information, including codec info and FPS.
Apart from playing any file format, VLC Media Player can also stream videos. And besides that, VLC also has other lesser-known functions such as the ability to rip a DVD. And now we are taking a step further to use a lesser known, yet most interesting feature of this player, which is to record a desktop.
No version of Windows has a built-in feature to record a computer’s screen. Windows 10 came close to implementing that functionality with Game DVR. However, this feature can only record games and app videos. Game DVR cannot function outside apps. That means to capture your computer’s screen, you’ll need a third party application, and most of these apps are not free.
But why install an additional software when you can use an already existing app to record your computer’s screen? In this tutorial we’ll walk you through the process of recording your Windows 10 screen using VLC media player.
Record Windows 10 Screen Using VLC Media Player
To record the Windows 10 screen using VLC, simply follow the steps below:
1. Open VLC Media Player. If you don’t have one on your PC, download it from Videolan’s official site for VLC.
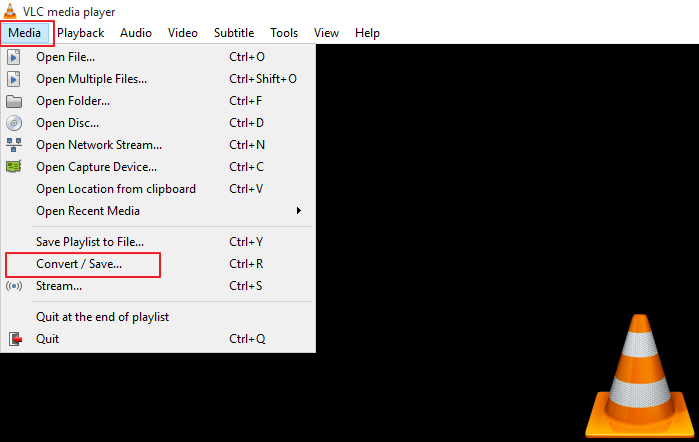
2. Click the Media menu on the top bar of the player, then select the “Convert/Save” option.

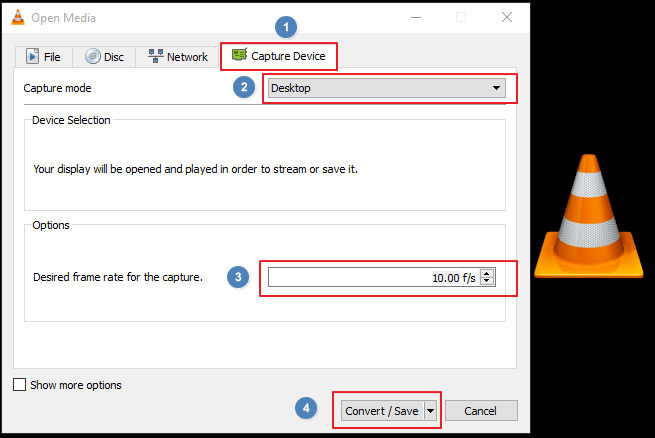
2. A new window will open. Click the “Capture Device” tab, and under the “Capture Mode” section select “Desktop.” Down there you’ll also find the option to select your preferred frame rate for the capture. Choose a decent frame rate – we recommend between 5 to 15 for good picture quality.

3. Click the “Save” button to continue.
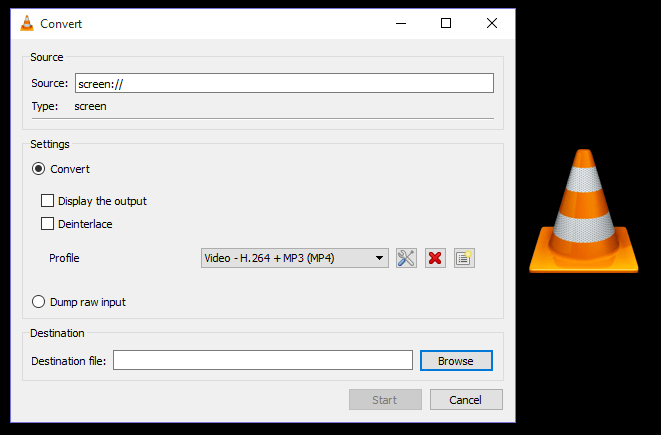
4. Clicking the “Convert/Save” button will open the convert dialogue box. This is where you will choose where you want your file to be saved. Click the “Browse” button in the destination section at the bottom of the window to select your preferred destination.

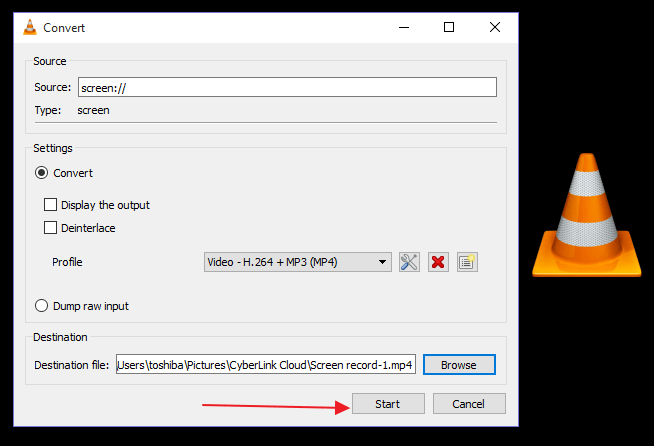
5. Click “Save” to continue once you’ve defined your preferred location, and the system will take you back to the convert dialogue. Now click the “Start” button to start recording the screen. Note that the “Start” button will only become active after choosing the destination file. It’s also worth noting that VLC will not show you any indication on the screen that it is recording.

6. Finally, to stop the recording, click the “Stop” button on the VLC player and save the file.

You can now open the file with VLC or any other media player to watch the screen recording.
Wrapping Up
While VLC Media player is a great tool for screen recording, it’s not the best tool for that functionality and is lacking in some areas. For instance, it only lets you record the entire screen in raw format. This means you can’t record a section of the screen, which leads to large-sized videos even for a short-timed screencast.
Also, it doesn’t let you use your voice in the screen recording. That means you’ll need to record your voice separately and then stream the audio along with the screen recording. Other than that, VLC media player is a great and convenient screen-recording tool that is free and easy to use. Also check out our article on how to add and sync subtitles in VLC Media Player.
Have you ever used VLC Media Player for screen recording? Share your experiences in the comments section below.