Source: https://www.makeuseof.com/tag/raspberry-pi-chromecast/
Capture Date: 03.04.2018 22:43:53
Advertisement
You probably already know that you can use your Raspberry Pi as a media center. You can even install Kodi on it for managing media offline and online. But what if you’re happier to leave it running Raspbian as the main operating system?
Well, if you have a mobile device you don’t mind using for managing your media, you could use this to cast a video to your TV. Yes: you can use your Raspberry Pi just like a Chromecast. You won’t be able to use the Cast button on Android, but YouTube videos, pictures, audio and images from your smartphone can be streamed to your TV.
Install the Raspicast App
Get started by installing Raspicast on your Android device. This is a free app that connects to your Raspberry Pi and streams data to it. As long as your Pi is connected to the HDMI input on your TV or display, you’ll be able to view the media on your phone. You’ll find Raspicast in the Google Play app store. Unfortunately, there is no reliable iPhone alternative for this.
Download: Raspicast for Android
It’s important to note that both the Android phone and the Raspberry Pi need to be on the same network for this to work. You can’t, for example, stream video from your phone to your TV if you’re sat on the bus. If you’re trying to share a video with someone sat at home, simply message them the link!
Configure Raspbian
With the app installed, turn your attention to the Raspberry Pi. This should be already connected to your TV via HDMI, and powered up. We tested this on a Raspberry Pi 3 running Raspbian Stretch. However, you should find it works with other Raspberry Pi distributions (although some of the commands may differ).
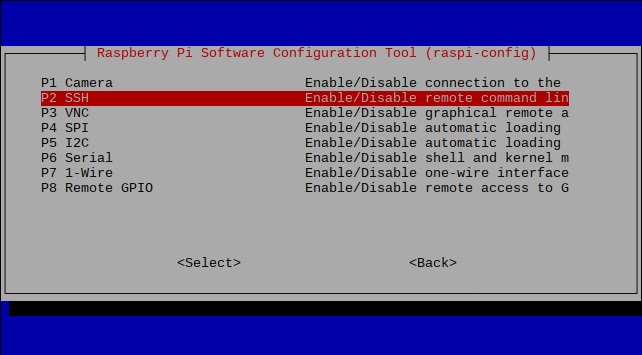
As you’ll need SSH enabled, here’s a quick primer. You have three options to enable it:
- Via raspi-config. You can run this from the command line using sudo raspi-config, then select Interfacing Options > SSH and use the arrow keys to confirm with OK.
- Use the Raspberry Pi Configuration tool. From the Raspbian desktop, open Menu > Preferences > Raspberry Pi Configuration. In the Interfaces tab, find SSH and set it to Enabled.
- Finally, if you prefer simplicity, you can enable SSH before you boot up your Pi. Insert the microSD card into your computer, browse to the boot partition, and create a new file. This should be called ssh, and have no file extension. Once you replace the SD card and reboot, SSH should be enabled.
The following can be done via a keyboard connected to your Pi, or using SSH. Check our previous guide to connecting to a Raspberry Pi via SSH. Setting Up Your Raspberry Pi For Headless Use With SSH Setting Up Your Raspberry Pi For Headless Use With SSH The Raspberry Pi can accept SSH commands when connected to a local network (either by Ethernet or Wi-Fi), enabling you to easily set it up. The benefits of SSH go beyond upsetting the daily screening… Read More
Now it’s time to run some updates. Start off by opening a terminal window on your Pi and running:
sudo apt-get update sudo apt-get upgradeThese commands will update your Raspberry Pi’s operating system, and find and install any software updates.
Install and Build OpenMax
With the updates installed, we need some prerequisite packages:
sudo apt-get install libjpeg9-dev libpng12-devThe packages libjpeg9-dev and libpng12-dev are necessary for building programs that can handle JPG and PNG images. This will enable the media to be cast to your Raspberry Pi via the Raspicast app on Android!
Now, install OpenMax. This tool is the best option for casting video, audio and images from an Android device to a TV-connected Raspberry Pi. It’s available via GitHub, and you can install it by “cloning” the data repository to your Pi:
git clone https://github.com/HaarigerHarald/omxivThis shouldn’t take long.
You’re nearly done; it’s time to build the OpenMax software. Begin by switching to the omxiv directory and using the make command.
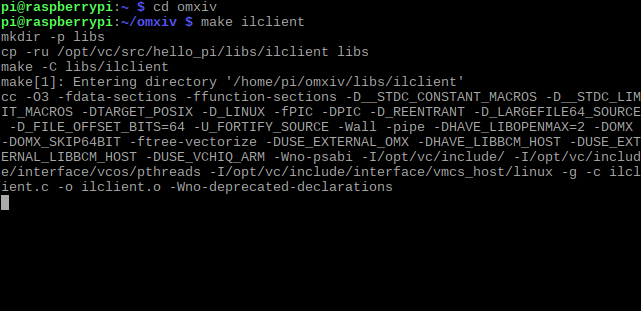
cd omxiv make ilclient makeThis will take a while. Once it’s done, you’ll be ready to install:
sudo make installA few moments later, OpenMax will be installed!
Get Ready to Cast!
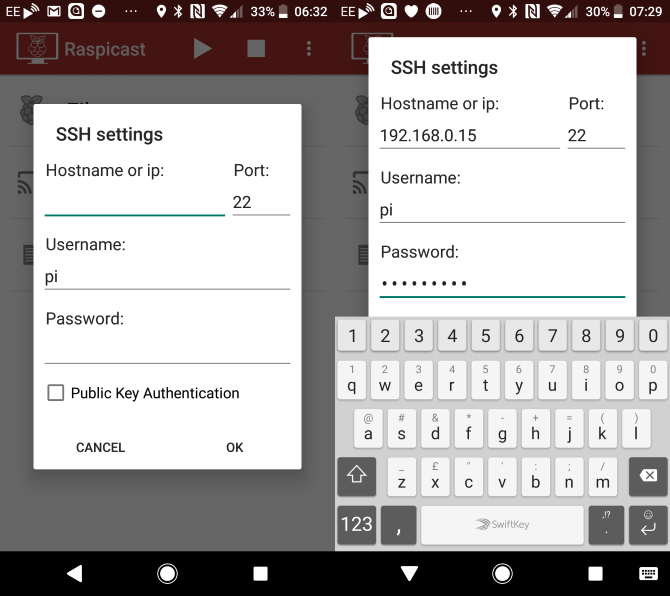
Everything you need to cast from your Android device to your Raspberry Pi is now in place. On Android, run the Raspicast app, and in the SSH settings input the Hostname or IP address of your Raspberry Pi. Follow this with your Pi’s username and password, then click OK.
To cast to your Raspberry Pi, you have two options. The first is to browse for the content within the Raspicast app and hit play. Alternatively, if you want to cast from YouTube, find the video in the app and tap the Share button.
Here, select Cast (Raspicast), and the video should automatically play on your TV! Meanwhile, to send videos, music and photos to your Raspberry Pi display, simply use the main Raspicast screen and select Cast. This will open a screen listing all videos on your Android device.
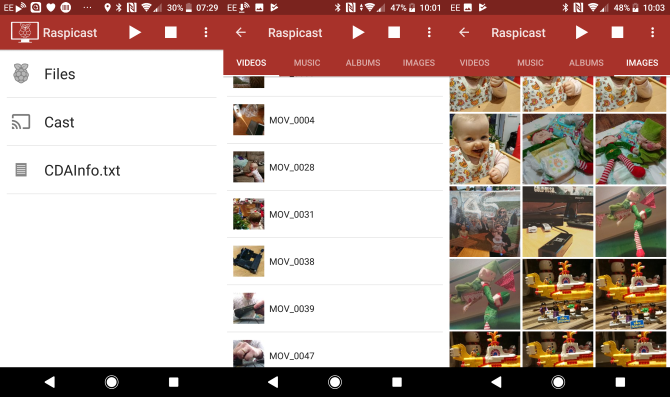
On one of the four tabs (along with Music, Albums, and Images), selecting a media file will prompt its immediate playback on your Raspberry Pi.
Need to change the IP address within the app (e.g. to cast to a different Pi)? Open the “three dots” menu and select SSH Settings. Simply input the new IP address and credentials.
More Raspicast Options
Also in the Raspicast menu, you’ll find a check box to Repeat the currently playing file. Further down the list, Audio output can be customized, using HDMI (default), local, both, or alsa. This will prove useful for anyone using an external audio solution with their Pi.
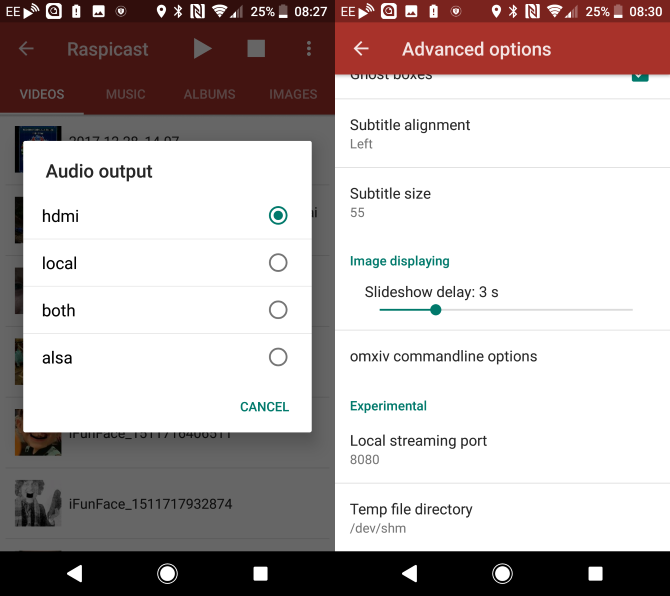
You should also check the Advanced options screen. Here you’ll find options for managing a queue of files, managing volume (audio volume offset), using HTTP if necessary (HTTPS is the default), specifying custom commands, and more.
Meanwhile, on the main Raspicast screen, use the Files button to navigate and play media stored on your Raspberry Pi!
You Can Also Cast With Kodi!
Now, there is a downside to all of this: you can’t run Raspicast with a Raspberry Pi running OSMC (a popular Kodi distribution). Unfortunate as this is, there is an alternative: the Kore remote control app for Android devices.
Download: Kore, Official Remote for Kodi
Usually, you’ll use this to remote control Kodi, but it’s also capable of casting to a Kodi system, including OSMC. Simply install the app, set it up with the IP address of your Raspberry Pi, and then head to YouTube. As with Raspicast, tap the Share button on the video you want to cast, then select Play on Kodi.
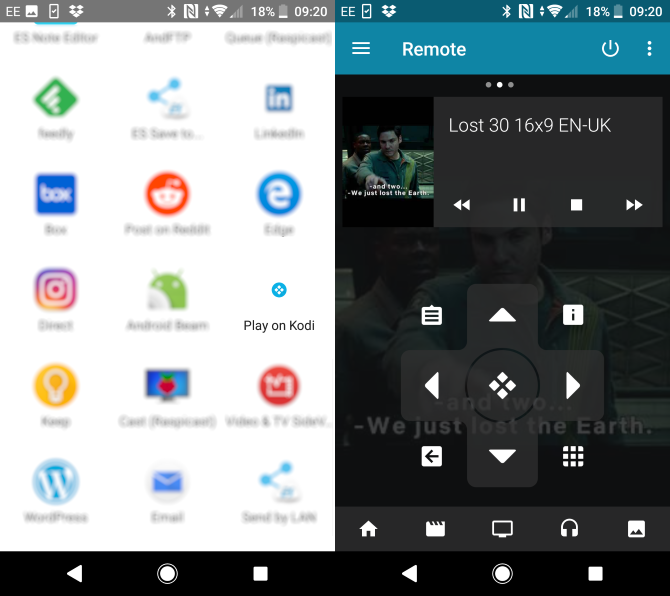
This will immediately stream the video to your TV via Kodi!
Other Chromecast Alternatives
The Raspberry Pi isn’t the only alternative to a Chromecast. You might already have a solution that you were unaware of, such as a set-top box or smart TV with YouTube compatibility. In this situation, casting videos from the YouTube app to the TV is usually possible as long as the receiver is on the same network.
Of course, other HDMI streaming solutions exist such as Miracast, but as long as you have a device with an official YouTube app (like the Apple TV), you’ll probably be able to cast to it. Three Wireless Display Technologies That You Probably Own But Don’t Use Three Wireless Display Technologies That You Probably Own But Don’t Use Want to relay your smartphone’s or laptop’s display onto a larger screen without wires? No, it’s not science fiction. You can wirelessly output video from computers and smartphones today. Wireless display technologies use WiFi to… Read More
Enjoyed this article? Stay informed by joining our newsletter!