Source: https://javascript.plainenglish.io/the-basic-vanilla-js-project-setup-9290dce6403f
Date: 25.12.2021
In the last article, I shared my reasons for fully investing myself in the vanilla JS techniques again, after over a decade of working with JavaScript frameworks. Today we are jumping straight into the basic project setup. Along the way, I will touch on various techniques, and discuss my rationale behind them, but I will not go into details about everything. Some of it will be reserved for future articles.
I would like to note that a lot of what is discussed here is attributed to our respected colleague, Vladimir Spirin, who has provided an example I learned from. This article is a mix of my interpretation of his techniques as well as some stuff I’ve added and removed.
I remember the first time Vlad had explained the approach without showing the code. I was skeptical to say the least. I did not really believe it was possible. And I’m sure you will be skeptical, too, as you read this article. I am hopeful that your skepticism will be melted away just as mine was when you sit down and try this for the first (or second) time. And I hope that you will be as happy as I am once you realize how simple everything can be. All of this really works, I promise you that. It’s already successfully applied in some of our production code (the rest is scheduled for conversion as time permits).
Before we start
If I were to name the single most important thing you need to know in order to be effective with Vanilla, it’s this:
Take advantage of the platform
This is from the Vanilla Redux Manifesto that we (try to) abide by in the front-end engineering team at Coin Metrics. (Btw, it’s this redux, not the other one.) In short, if there’s something the platform can do for you, understand what it does and take full advantage of it. Do not reinvent the wheel just because you don’t like how the platform does it or what it looks like.
The files
Let me get this out of the way: you do not need a build tool for this setup. Ideally, you just want to be able to open the index.html file and start working. While this sounds reasonably easy, we will nevertheless cover some details here that are probably not quite obvious to those that are just getting started with Vanilla (or maybe, like me, have done this for years in the past but completely lost the touch).
The bare minimum you need is a folder to house your files, index.html, index.js and index.css. (You can name CSS and JavaScript files anything you want, but the HTML file is usually named index.html because that’s what the HTTP server will look for when you go to the root path of your application URL.)
Some developers like to have web servers that automatically reload parts of the application based on what’s changed in the code. I find that this has not been reliable for me, and the cost of using these tools is comparatively high (I don’t need any additional tooling to open a file in the browser, for example). Many editors will even let you get similar functionality for free if you are working with plain HTML/JavaScript/CSS, which, to me, feels like a better deal.
Keep in mind that the basic theme of the vanilla approach is not performance or reduction in bundle size or anything like that. People are happy with React’s performance, so performance is clearly not a very desirable characteristic. Our goal is to not introduce complexity that isn’t strictly needed by our application. This starts with any tooling around the project and continues with the code.
Adding CSS to the page
Style sheets are linked into the HTML file using the <link> tag inside the <head> tag:
<!DOCTYPE html>
<html lang=”en”>
<head>
<meta charset=”utf-8″>
<title>My app</title>
<link rel=”stylesheet” href=”index.css”>
</head>
<body>
</body>
</html>
I tend to use relative paths to reference the stylesheets as well as within the stylesheets to reference assets. This removes the need to have a web server in order to preview the changes.
If you find you cannot use relative paths because of the deeply nested folder structure, address the folder structure, don’t add tools to make it easier to keep the complex structure. Removing complexity is always cheaper.
Adding JavaScript to the page
To link the JavaScript to HTML, most of us immediately think, “I know this! Put the <script> tag at the bottom of the <body> tag!” And that is correct… except that there are four other ways to add the JavaScript to your page, and they all have their uses.
First, and the most obvious way is to do this:
<script type=”application/javascript”>
console.log(‘Hello, world!’)
</script>
The <script> tag can go anywhere in the page, including within <head>, and any part of <body>. Wherever you place it, it will have access to any elements that come before it. I know many will dismiss this as pattern just used for small toy projects, but it’s a completely valid pattern if you don’t have a lot of code. It’s not always necessary to write a lot of code, and when there’s not much code, why would you even bother to create a separate file? I will touch on this again when I get to breaking larger applications down in a future article.
As mentioned before, the typical way people go about adding JavaScript is this:
<body>
…. <script src=”index.js”>
</body>
The reason this is done is because it ensures the page content is there before the code is evaluated. However, this is currently my least preferred way of doing it because it blocks the page until the script is loaded, does not allow multiple scripts to load in parallel, and is similar. We’ll get to the preferred way later.
The third way is to add the script tag to the <head>.
<head>
<script src=”index.js”>
</head>
If you do it that way, then your script does not have access to the <body> element immediately. On the other hand, it is able to execute before the browser has had a chance to parse and lay out the page content. It also has access to the <head>, and any preceding elements in it, the ability to add new elements to it, etc. Any further parsing of the page is halted until the script is completely loaded and evaluated (meaning everything inside it is executed). This is the pattern you can use if you want to do some initialization before the page shows, such as registering web workers, for example, or dynamically adding <script> tags to the page depending on the circumstances (but don’t go crazy with this because it does add complexity to the code base). Normally, you don’t want all of your app to be in this script. Only barely enough code to do the initialization.
Script tags can also have one of the following two attributes: async or defer. Unlike the previous two methods, they do not block the parsing and drawing of the page while the JavaScript code is being loaded, and all tags marked with these attributes load in parallel. Because of the non-blocking nature of async and defer scripts, we usually add them to the <head> as there is usually no benefit in adding them further down the page.
The async script will be loaded in a separate thread, and once loaded, it will be evaluated immediately, regardless of whether the page is already loaded or not. There is also no guarantee as to the order of evaluation relative to other scripts on the page, so this is, in that sense, the least reliable way of evaluating your script if you have more than one. Also, because there are no guarantees about the page contents at evaluation time, you will need to wait for the DOMContentLoaded event if you want to work with page elements. I have not yet found a good use case for the async script, but it has its unique characteristics that will probably come in handy in some cases.
The defer script tag is by far the most useful one for general use. It works similar to async, with the notable difference that the evaluation is postponed until the page is parsed. This is effectively the same as placing the <script> tag at the bottom of the <body> tag, except that it does not block the parsing of the page. It is especially useful when there are multiple script tags on the page that all use the defer attribute as they will load in parallel but execute sequentially in the same order in which they appear in the page. This makes placing the script tags at the bottom of the <body> pretty much obsolete.
DOM node creation
One of the things developers with Vanilla experience dread is the creation of DOM nodes. Indeed, DOM node creation results in very verbose code that is far removed from the HTML syntax, which is, if not optimal, at least vastly superior. There are many ways to make this easier. A lot of the frameworks contain code and specify the syntax for codifying such efforts. JSX is one notable example. Each technique has its price tag, of course, some high, some less so.
I imagine, then, that nobody would object to a method that uses only the familiar HTML syntax, and does not require any additional tools and code to create DOM nodes — essentially making it free in terms of the additional cost. The technique in question is: writing HTML in the HTML file. Duh! In other words: do not create nodes in the JavaScript to begin with.
The essence of what we want to do is create as many DOM nodes as we need for most, if not all, of the application UI in the HTML file — and hide anything that should not be showing immediately. You can think of the index.html file as of a repository of all UI elements that you need in your app.
In a future article I’ll detail some of the variations you may need, but here are some that you do not need in the HTML file:
- Elements in which only the text content changes
- Elements on which only classes change
In other words, you don’t need literally every possible permutation of an element, but only the ones that would require you to add new elements. Sometimes that’s not entirely possible, but we’ll get to that at a later date.
Here are two examples.
Views that can be toggled on and off depending on what ‘page’ the user is on:
<div id=”view-loading”>Loading…</div>
<div id=”view-hello” class=”hidden”>Hello, world</div>
Error messages:
<p class=”form-field”>
<label>Name: <input id=”name-input” type=”text”></label>
<span class=”error hidden”>Name is required.</span>
<span class=”error hidden”>
Name cannot be more than 15 characters long
</span>
</p>
Supposedly the hidden class contains a rule like display: none; to hide the elements that is not needed initially.
Every tag that must be accessed through JavaScript is bestowed with a unique id attribute. A good naming scheme for the tags is pretty important as there can be many of them. Do not be put off by how many of such elements you have. There may be many, but there’s no rule that says you can’t have too many. You will have as many as you need. Even when you have lots of them, you can always write some JavaScript in the developer console to get them all by executing document.querySelectorAll(‘[id]’) and converting all matching elements to a JavaScript string that you can copy/paste into the editor. For instance:
let s = ”
document.querySelectorAll(‘[id]’).forEach(el => {
let {id} = el
let name = id.replace(/-(.)/g, (_, c) => c.toUpperCase())
s += `const $${name} = document.getElementById(‘${id}’)n`
})
console.log(s)
Organizing the JavaScript code
In many (but not all) cases, most, if not all, of your application code will live in a single file.
I’ll wait for it to sink in.
I’ve seen developers differ on this point, and I can see why someone would be unable to suspend their disbelief after years and years for coming up with various ways of organizing files, and accompanying elaborate rationales. I know it sounds outrageous, but bear with me.
The first question that you should ask yourself is this: what are the reasons for splitting files into modules, to begin with?
Organizing code is one of the top reasons (although it is not the reason modules came into existence). By organizing code, we usually mean any number of more or less logical separation of the codebase. The aim of this approach used to be to create a bunch of isolated and self-contained building blocks and compose them to build the applications, but it is more often than not, practiced simply as a coding style rather than with a specific purpose.
The method by which we segregate the code into the building blocks does not need to be by file/folder or even by modules. Files and modules are simply some of the many ways in which people have solved this problem.
When we use file and folder structure to facilitate code organization, we normally end up using module systems. Those are not just about physical files and folders but also about the methods and tools for referencing the content within other files. If we ask ourselves why we did not use other methods to solve the same problem, arguments become a bit vague and/or illogical, and end up being more along the lines of personal style and habit rather than a real pros and cons analysis.
I can’t think of a single good reason why I would absolutely need to use files and folders for logical/semantic code segregation. But I can think of a couple of reasons why not:
- It requires you to create a naming scheme. That alone is one of the hardest programming challenges. On top of that it, like any other rule, restricts what you can or cannot do, and may lead to a situation where you avoid doing things because it would either break the rule or require you to modify the rule and shift files around. Shifting files around is often more labor-intensive than moving code about within the same file, so it gives me an incentive to avoid it.
- It requires a build tool to collect all the files into a single bundle. Build tools do not come for free. They add to the development time, they require special setup during CI and deployment, and they often require regular audits because they come with thousands of dependencies.
- It requires more complex tools to perform refactoring and search things within the project. This is more of a DX thing, and if some method took care of the above two issues I could live with this one. If I can avoid this issue for free, though, I am certainly not going to complain.
Another popular reason for modules is code reuse. This is something I actually use in my projects. As needed. For example, I may have several apps that share the same functionality, or I may be writing a full-stack project that requires shared functionality between the server and the client. But if it’s sharing of functionality that I’m after, I don’t need many files, nor do I need to preemptively create a bunch of files just because I may need to share the code some time in future. The way I split my code out into modules is very similar to what Webpack does with its common chunks functionality — I group code by their actual usage patterns. In short, code reuse does not require an elaborate file-based organization.
I’m also ok with having a function or two duplicated here and there if I can avoid creating a new 1-line module or ten (yes, I know it’s popular in the JavaScript community, but that does not mean it’s a good thing). And let’s not forget that sometimes code reuse introduces complexities of its own. Defaulting to reusable modules is a form of premature optimization.
While the single script pattern is not a rule that necessarily applies to all projects, and is not a requirement for a successful one, it’s, in my opinion, the best starting point. Sticking with it for as long as it makes sense will generally result in simpler code overall, contrary to commonly held beliefs.
Editor tools
If you are concerned about whether having one big file is manageable, don’t be. Most editors work better with single files than multiple files.
Because of the single (main) file setup, I tend to use the editor in a slightly different way than with the usual excessively… erm… fully modularized code bases.
I find code folding to be indispensable. From time to time I collapse everything and scroll about to adjust the order or find something I’m interested in. More capable editors will let me select the collapsed section of the code without expanding it, making it easier to reorganize the file.

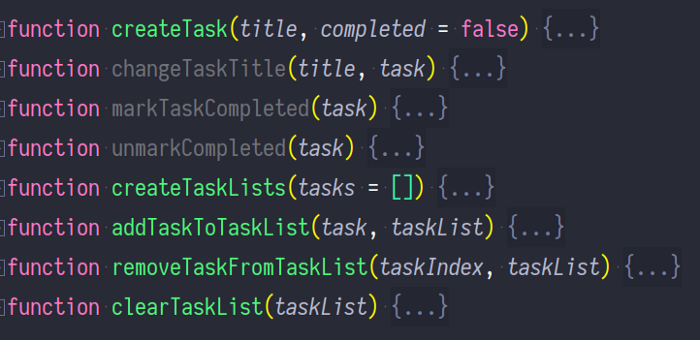
Code folding with collapsed functions in a JetBrains IDE
Most editors will also offer an outline view where only the functions names are listed in a separate panel. I normally keep the outline view on the left in place of the usual file explorer because I only work with one or two files at any given time, and therefore do not need a whole lot of file exploring to begin with.

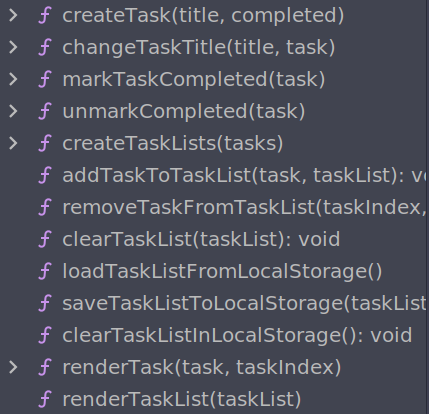
The Structure panel in a JetBrains IDE showing functions defined in the current module
These and other tools become vastly more useful, too, when all you have to work on is one or two files. For example, detection of unused functions is much more reliable in the JetBrains IDEs when using the single-file pattern. Refactoring tools are more reliable, and work even in editors that do not support advanced forms of code intelligence. In a pinch, a simple search-replace can get the job done.
Some people like to section out the code using comments and jump to them using search. I only do this if I have subgroups within the major groups of functions.
Whether your editor knows how to deal with your single file code has absolutely no bearing on the quality of your code, nor is it an indication thereof. I’m just pointing out that there are ways in which you can make things easier to work with.
Starter code layout
Now let’s talk about the logical sections that I normally have within the file. I call this the ‘starter’ code layout because regardless of what the final layout ends up being, I always start it this way.
In my applications, the general layout of the JavaScript code initially looks like this:
- Constants, helpers
- Application state
- State accessor functions (getters and setters)
- DOM node references
- DOM update functions
- Event handlers
- Event handler bindings
- Initial setup
Constants and state are defined at the very top to allow the reader to ease themselves into the application world.
const TODAY = Date.now()
const LOADING = 0, READY = 1, ERROR = 2let state = { … }
Yes, those are all module-scope variables. We’ll get to that later. The application data (or state) may be defined in one or more variables. There are no rules as to how many variables you should have, whether something is too much or too little. It depends on the app.
Just below the variables holding the application data, I would normally have functions for working with the data. This is not a recommendation. It’s just something I like to do.
let state = { … }let setLoading = () => state.view = LOADING
let setReady = () => state.view = READY
let isLoading = () => state.view === LOADING
let isReady = () => state.view === READY
I find that I usually want to have getter and setter functions for various pieces of state. As the code base grows, I find that it’s easier to add or modify the application if I have dedicated accessor functions. I define accessors as I need them, not right from the start. I also make a point of removing them as soon as they are no longer needed. Some people prefer to manipulate the state throughout the application without defining accessors, and that also works just fine. A bit messy for my taste, but we’re not here to argue about taste anyway.
I treat functions that fetch data from and send data to a back-end service as part of the accessors group.
let isLoading = () => state.view === LOADING
let isReady = () => state.view === READY
let loadSongs = () => fetch(‘/api/songs/)
.then(res => res.json())
.then(data => {
state.songs = data.songs
state.view = READY
})
.catch(() => state.view = ERROR)
Other people may bundle these into a separate group. I group accessors according to the common topic, so async functions go into appropriate topics.
After the data-related functions, I place everything related to DOM access and manipulation.
DOM node references are top-level variables that point to concrete DOM nodes or groups of DOM nodes. Like other Vanilla developers I’ve talked to, I find that a special naming scheme for these variables to distinguish between DOM and non-DOM values helps.
let D = document
let $play = D.getElementById(‘play’)
let $stop = D.getElementById(‘stop’)
let $viewLoading = D.getElementById(‘view-loading’)
let $viewReady = D.getElementById(‘view-ready’)
let $$instruments = D.querySelectorAll(‘.instrument-option’)
I’ve also used another pattern in the past which looks like this:
let $refs = {}
document.querySelectorAll(‘[id]’).forEach($el => {
let key = $el.id.replace(/-(.)/g, (_, s) => s.toUpperCase())
$refs[key] = $el
})
I’ve also seen patterns like this:
let REFS = {
playback: {
play: document.getElementById(‘play’),
stop: document.getElementById(‘stop’),
},
views: {
[LOADING]: document.getElementById(‘play’),
[READY]: document.getElementById(‘loading’),
},
}
I settled on the first pattern because I find that having a flat list of variables gives me the most flexibility (e.g., I don’t have to worry about where they go in a hierarchy if I move them), but each way has its advantages and disadvantages.
The next group is the DOM update functions. These update DOM nodes either declaratively or imperatively, depending on the type of manipulation. I will write about that in more detail in a future article. Here I’ll just give a few examples:
let updateView = () => {
$viewLoading.classList.toggle(‘hidden’, !isLoading())
$viewReady.classList.toggle(‘hidden’, !isReady())
$viewError.classList.toggle(‘hidden’, !isError())
}
let updateSongDetails = (songData, index) => {
let $song = $$songs[index]
$song.querySelector(‘.active’)
.classList.toggle(‘hidden’, !isSelected(index))
$song.querySelector(‘.title’).textContent = songData.title
$song.querySelector(‘.tempo’).textContent = songData.tempo + ‘bpm’
}
let updateSongs = () => state.songs.forEach(updateSongDetails)
Next, we have what I call event handlers (as contrasted to ‘event listeners’; excuse the poor naming, I welcome suggestions for a better name). These are called by event listeners that listen to DOM and other events (e.g., timers, WebSockets, etc), and update the application state and the user interface by calling the accessors and DOM updaters. The reason they are not directly registered as event listeners is modularity — by requiring plain values as arguments rather than the Event object, these functions can be called from each other, or be invoked in different event listeners using different parameters to achieve variation, and so on.
Event handlers are usually (but not necessarily) very clean-looking functions without too much logic and branching. They sometimes read like slightly more technical user stories.
let onPlay = () => {
setPlay()
updatePlaybackButton()
updateScoresheet()
startPlaybackTimer()
}
let onStop = () => {
stopPlaybackTimer()
setStop()
updatePlaybackButton()
updateScoresheet()
}
let onEdit = scores => {
onStop()
setScores(scores)
updateScoresheet()
}
let onSongLoaded = () => {
setInitialScores()
updateScoresheet()
updatePlaybackButton()
updateLoadError()
}
let onLoadSong = songId => {
onStop()
loadSong(songId).then(onSongLoaded)
}
They also serve as the checkpoints I can refer to when I want to debug the application: if I know the user action that lead to a bug, I know what function to start with (more often than not).
I will make a slight detour here and point out that, yes, there is no ‘reactive state’ here. I have tried several different patterns and I conclude that, for me, reactive state tends to scatter and/or obscure the the relationship between the data and the nodes that are being updated. I prefer this to be explicit. The trade-off is that you have to manually construct these relationships in the form of related function calls. I also prefer to get this done with what’s available rather than building a [mini-]framework just to do it in a way the platform was not designed to do (as long as it works). Your preferences and mileage may differ.
After the event handlers, I have event bindings, which is where I register event listeners with the DOM nodes. Any processing of the event object to extract the values is performed in the listeners before invoking the handler.
$play.onclick = () => onPlay()
$stop.onclick = () => onStop()
$scoreEditor.oninput = ev => onEdit(ev.target.value)
Lastly, I set up some initial state. Something like this:
setReady()
updateView()
This pattern has generally served me well in all of the projects that I worked on thus far. There are projects that required a non-trivial deviation from this way of organizing the code — like writing embedded apps, or full-stack ones — but even in such cases, this layout has been an adequate starting point and the general spirit of the layout remained intact.
Why global mutable state
Now to address the elephant in the room (one of them anyway): yes, state is global and mutable. A knee-jerk reaction to this with many developers is, I imagine, “OMG, shared mutable state!” In our industry, there is a long history of argument against shared (global) mutable state. Because of this, some developers get a fit of rage when they see someone suggesting it, let alone doing it.
For most synchronous code, this is not a big issue. However, your application will not always contain just synchronous code. I’ve recently addressed an issue in a library I was using in my application, where two separate instances were executing async code inspecting the state stored in a shared mutable variable. These issues do happen.
In fear of these issues, developers have found many clever solutions, hoping to eradicate them completely. In the heat of argument, many of us forget that despite all efforts, we still have production bugs. And we also forget that these issues do get fixed — without needing to get rid of the shared state. Fear usually does not inspire truly effective solutions, in my opinion, as it tends to drive people into tunnel vision.
The reason I’ve chosen to use global mutable state is that — apart from races generally not being such a big issue for me to begin with — the potential for races of the shared access is far outweighed by the benefits I get from this approach. To name a few off the top of my head:
- It removes the need for functions to pass the state values around via arguments: no need to think about how much of it you should share, what position of the argument, argument naming, etc.
- There is no need for any function to keep a copy of the state and similar weirdness that happens when you are passing your state around, memory leak resulting from it, etc.
- Simplifies the code that has to work with state.
The reason for mutable state is simple: mutating objects has always been the most natural JavaScript you can write.
Consider this data:
let state = {
tasks: [
{ title: ‘Learn Vanilla’, completed: false },
{ title: ‘Write a blog post’, completed: false },
]
}
Let’s write a function markCompleted which marks a task as completed. First let’s see how it could be done without mutating state:
let markCompleted = (index, state) => ({
…state,
tasks: state.tasks.map((task, i) => index === i
? { …task, completed: true }
: task
)
})
Now let’s see what it looks like if we mutate the global state:
let markCompleted = index => state.tasks[index].completed = true
As you can see, the code becomes dramatically simpler. It doesn’t just look simpler. It actually costs less to perform, too, leading to better performance.
The main take-away here is that using the style that naturally fits the platform tends to make the code simpler without any additional tools or effort.
Up next
In the next article, I’m taking you through some basic techniques which we can use to efficiently create and manipulate the DOM nodes.
You would like to work with Vanilla JS full time?
If you would like to join a team that goes by the principles outlined above, you might be interested to learn that Coin Metrics is hiring (Vanilla) JavaScript developers to join their front-end engineering team.
Content retrieved from: https://javascript.plainenglish.io/the-basic-vanilla-js-project-setup-9290dce6403f.